how to make a hair fork
you need:
birch plywood (the really fine kind found in art stores)
3$
sandpaper from discount store like biglots 1$
coping saw from walmart 4$ (most people have one of these in the house)
extra
extra fine polishing sandpaper 1$
metal hand file set? i got files for xmas
im sure you can find a cheap set on ebay
or at your local hardware store.
glossy poly spray i use a cheap 3$ can that lasts about 4 forks or 18 hairsticks.
for
the color i use liquid watercolors mixed with water. i bought this in a set of 12 tubes of colors for 6 dollars.. one tiny
tube should last for 12 forks if you use it right.
im sure this seems expensive to you but once you buy most of the
stuff you are set to make lots and lots of hair toys. how much does it cost to buy a wooden fork online? ive never had to
buy anything but wood after the 1st one.
ok here is how I make forks.
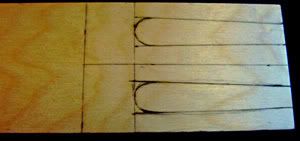
1) draw shape of desired fork on wood
as
you can see im making 2 forks in this picture... sometimes its easier to cut more than one fork "blank" at a time. make sure
that your drawings are symetrical. and that you draw a little bigger than the finished product.
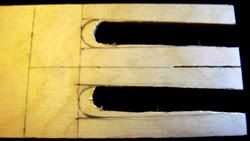
2) cut out shape with coping saw... go slow so you stay outside the lines... coping saws are great because they
allow you to cut curves... i want an electric scroll saw so that i can make many forks a day but alas i do not have 90 dollars.
as
you can see i was unable to follow the lines perfectly. first you cut out the middles then you cut the forks from the big
piece of wood...beleive me its just easier this way. you will get closer to the lines with the files before cutting the forks
off the big piece of wood
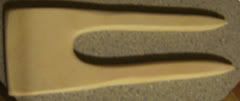
now after you have evened it out with the files cut the forks out like this
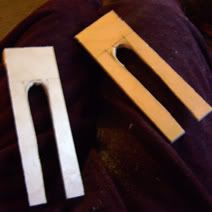
these are what i call blanks
3) take metal files and slowly shape the wood into the desired curvyness.. it will
feel very very rough. this step should take you almost 40 minutes if you are watching tv while doing it like i do.
4) sand it down so that its as smooth as you can get it without using the polishing extra extra fine grit paper.
make sure that you sand off any lines drawn onto the wood
5) mix up a SMALL amount of color with a TINY amount
of water some colors work better than others on wood so experinment on some scraps to find a good color.
paint on your
color onto both sides of the fork and let it sit for 2 minutes then wipe off exess with a paper towel. the color most likely
will not be dark enough yet use your blowfryer on the wood untill it is mostly dry then recoat it and let it sit for three
minutes then wipe it off and blowfry it again... only you can decide how many coats it will need as each color requires a
different amount of coats. after you have acheived the right color blowfry the wood on low until it is dry.. this whole step
takes me about 13 minutes
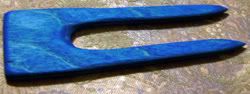
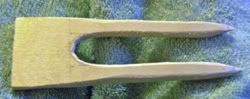
i used blue on this fork as you can see the grain is highly visible when you stain it with watercolors
6) put a nail
into a wall or a board that you dont care about getting gloss spray on. make sure that the nail sticks out at least 1.5 inches.
ive heard of using wire
to hang but a wall is just easyer
7) hang up the fork making sure no part of it touches the
wall.. spray evenly on both sides... let dry 15 minutes then recoat then wait annother 15 minutes and re coat again then let
it dry for about 30 min thats 3 coats so far
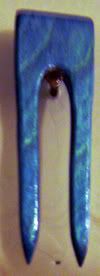
here is the fork hanging on the wall drying after its first coat
8: remember that really really really fine polishing
sand paper? use it on the fork to make really really smooth but be careful not to take the color off.
9) recoat with poly
gloss spray. let dry annother 30 minutes. if its still not as glossy and smooth as you want it lightly use the polishing paper
on it again and put annother coat of poly on it. wait 40 minutes
10) once its smooth to taste let it dry overnight
11)in
the morning admire your beautiful creation.. take pictures and post them on LHC.. use it to put your hair up and go about
your day.
this whole proscess exept for letting it dry overnight should take you 5 hours... but i have to admit my
first fork took longer... i would stay away from making 3 prong forks at first... try making a 2 prong fork as they are very
easy

was i helpful?
if you have any questions pm me
oh i forgot to mention that you dont have to stain the fork...
you can paint it with acrilic paint instead if you want... im thinking of making myself a multi colored one thats got flowers
painted all over it and some gold paint encorperated into the design.. but you still have to cover the paint with poly spray
for gloss and protection...
have fun